
How to view save passwords on Microsoft Edge

Saving passwords in the browser is convenient. It will make your browsing smooth, and easy since every time you visit a site you don't need to fill-in or type your password.

However, make sure that you are the only one using the computer or else if the computer is shared then everyone can use your password and they can access the websites in which your password is readily available to automatically fill-in every time the website is open on the browser.

Yes, convenience and security sometimes doesn’t go together. It might be convenient to do, by saving password on the browser but you need to trade off security or if you don’t saved the password and you need to type every time your password, it might not be easy to do but it is more secured.

And also saving password on the browser, would sometimes results to a forgotten password. So, if ever you browse the site in an incognito or private mode. Then you will need to type your password, or if you browse the site on another computer, you will also need to remember and type your password.

For this kind of scenario, as long as the password is saved on Microsoft Edge or any browser, password saved on the browser can be retrieved.

Steps below shows how to reveal or retrieved the saved passwords on the Microsoft Edge browser.

To begin click on the ellipsis or the 3 dots to open settings which can be found on top right corner.

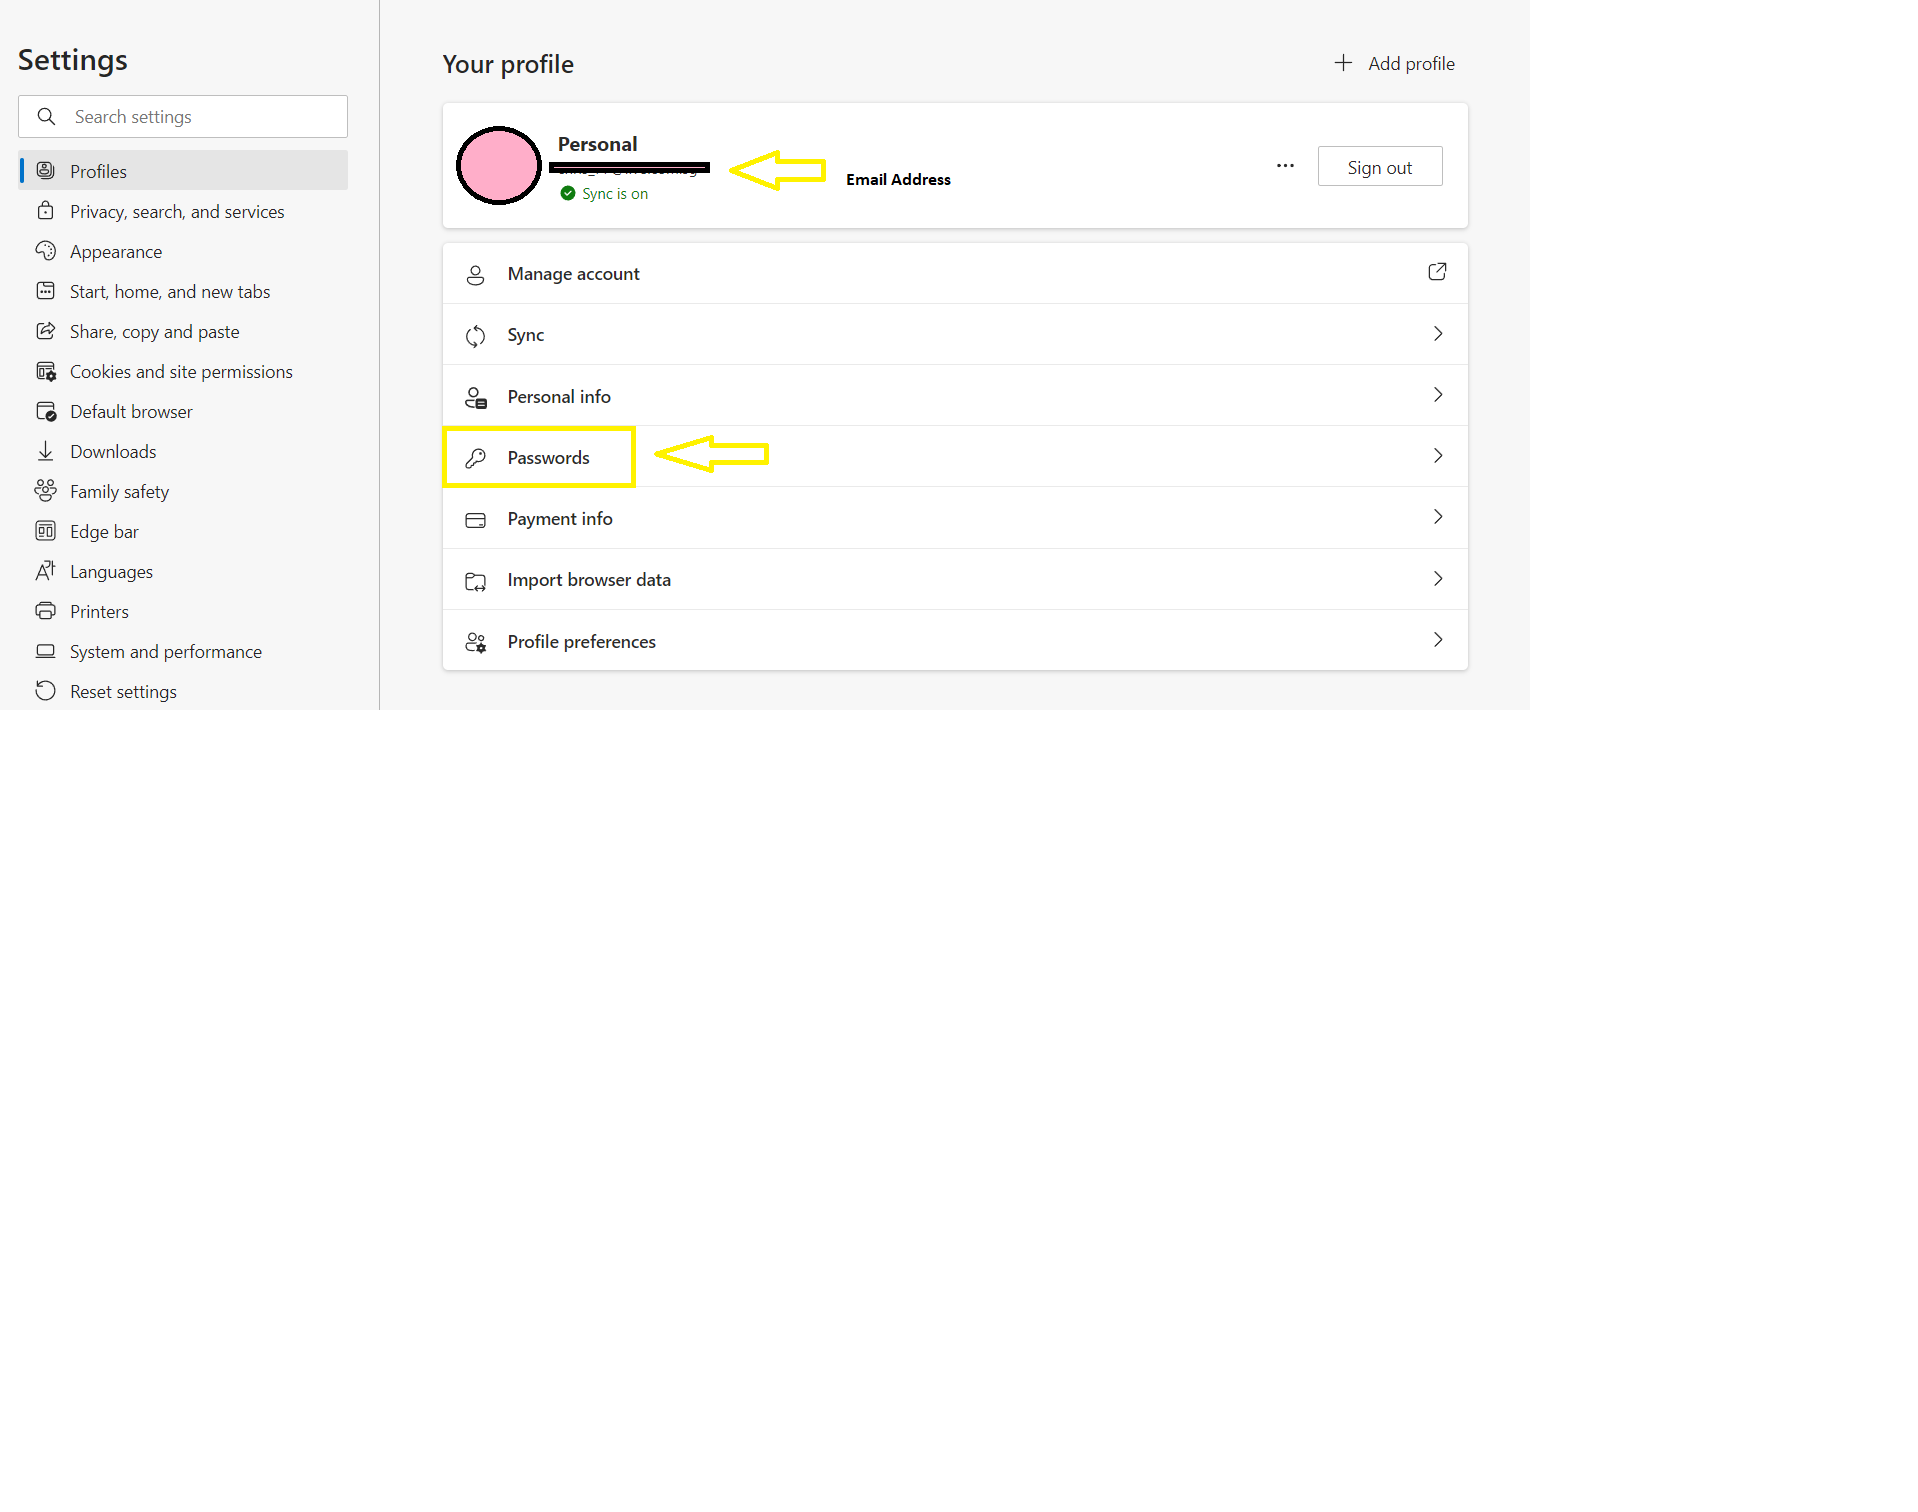
On the window that will open, click on Profiles and find the "Password" option.

On the password window, the URLs or websites with saved credentials can be seen.

Click the "eye" icon to view the password. The browser will ask for a verification like your login password to continue viewing the password. Enter your login password and the password will be shown.

 Please find screenshots below


That's it till next time, make sure to take care of your credentials and create a complicated password or passphrase that is not easy to guess, for example: The_Good_Life_isonhigh-Angels2022


Cheers! Take care. Till next Time.

Stay safe! and keep things up! 

Do ASAP, Always Say A Prayer...

Practice O.T.G. = Obedience TGod

================================

Free Android Apps:

Click  links below to find out more:

Free Android Apps:

Click  links below to find out more:

Excel Keyboard guide:

https://play.google.com/store/apps/details?id=chrisjoms.myexcelapplicationguide

Heaven's Dew Fall  Prayer app for Android :

https://play.google.com/store/apps/details?id=soulrefresh.beautiful.prayer

Catholic Rosary Guide  for Android:

Pray the Rosary every day, countless blessings will be showered upon your life if you recite the Rosary faithfully. 

https://play.google.com/store/apps/details?id=com.myrosaryapp

Divine Mercy Chaplet Guide (A Powerful prayer) BFF = Be Filled Faith:

https://play.google.com/store/apps/details?id=com.dmercyapp  

Comments

Popular posts from this blog

Notepad++ convert multiple lines to a single line and vice versa

Notepad++ is an awesome text editing tool, it can accept regex to process the text data. If the data is in a “.csv” format or comma separated values which is basically just a text file that can either be opened using a text editor, excel or even word. Notepad++ can process the contents of the file using regex. Example if the data has multiple rows or lines, and what is needed is to convert the whole lines of data into a single line. Notepad++ can easily do it using regex. However, if the data is on a single line and it needs to be converted into multiple lines or rows then regex can also be used for this case. Here’s an example on how to convert multiple rows or lines into a single line. Example data: Multiple rows, just a sample data. Press Ctrl+H, and  on "Find what" type: [\r\n]+ and on "Replace with" type with: , (white space) --white space is needed if need to have a space in between the data. See image below, "Regular Expression" must be se

WMIC get computer name

WMIC get computer model, manufacturer, computer name and  username. WMIC is a command-line tool and that can generate information about computer model, its manufacturer, its username and other informations depending on the parameters provided. Why would you need a command line tool if there’s a GUI to check? If you have 20 or 100 computers, or even more. It’s quite a big task just checking the GUI to check the computer model and username. If you have remote computers, you need to delegate someone in the remote office or location to check. Or you can just write a batch file or script to automate the task. Here’s the code below on how get computer model, manufacturer and the username. Open an elevated command prompt and type:     wmic computersystem get "Model","Manufacturer", "Name", "UserName" Just copy and paste the code above, the word “computersystem” does not need to be change to a computer name. A

How to check office version from command line

The are quite a few ways to check office version it can be done via registry, PowerShell or VBScript and of course, good old command line can also do it. Checking Windows office version whether it is Office 2010, Office, 2013, Office 2016 or other version is quite important to check compatibility of documents; or just a part of software inventory. For PowerShell this simple snippet can check the office version: $ol = New-Object -ComObject Excel.Application $ol . Version The command line option will tell you where’s the path located; the result will also tell whether office is 32-bit, 64-bit and of course the version of the office as well. Here’s the command that will check the office version and which program directory the file is located which will tell whether it’s 32-bit or 64-bit. Command to search for Excel.exe: DIR C:\ /s excel.exe | find   /i "Directory of"  Above command assumes that program files is on  C: drive. Sample Outpu