
No bootable medium found error VirtualBox

Migrating from physical to virtual or P2V is a common thing to do. In this virtualization era.

If hardware or a server is showing some issues, like rebooting by itself when no changes are made and the server is at the age of a primary 3 kid. Then this could be that the server is showing some signs that it needs to be retired.

P2V is a good option if an existing powerful server that is not fully utilized and is able to handle another load.

Migrating from OpenStack or exporting OpenStack VM to a volume so it can be used outside of OpenStack is another practice also. But sometimes things don’t go smoothly and few bumps or issues here and there may arise at times.

For example doing P2V in VirtualBox for a Linux system shows an error, “FATAL: No bootable medium found! System halted.” And you let the VM run for hours hoping that it will just boot by itself but it won’t just budge the error persist no matter how long you wait.

P2V is migrating or cloning a physical server to a virtual environment, which basically means that whatever things that is on the Physical server must also be present on the virtual system.

The OS that is being migrated to virtual, will have the same settings as it was originally installed on a Physical server, for example if the Physical server uses serial connection or has a serial dongle then when it is migrated to virtual then it will look for a serial port as well.

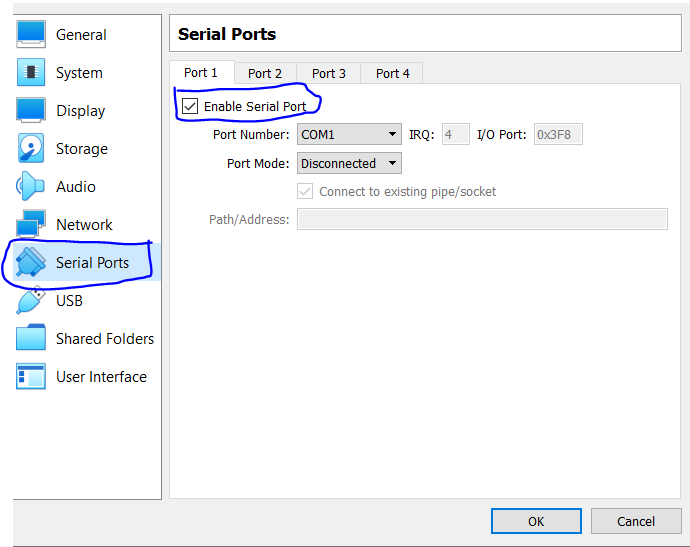
By default, in VirtualBox serial port is not enabled. Thus, sometimes will result to a “FATAL: No bootable medium found! System halted.” Error.

In my case I got this error when doing P2V but I realized that Physical server does use serial port. So, adding or enabling the serial port in VirtualBox does resolve the issue.

However, adding or enabling serial port in VBox still got error. Then you need to inspect the Physical server, maybe there are other dependencies or options that is needed and has to be present in the VM machine. Or simply, it is just another issue that requires time and troubleshooting.

Please find images below for the error and enabling serial port in VirtualBox.


Cheers. Till next time.

================================

Free Android Apps:

Click  links below to find out more:

Excel Keyboard guide:

https://play.google.com/store/apps/details?id=chrisjoms.myexcelapplicationguide

Heaven's Dew Fall  Prayer app for Android :

https://play.google.com/store/apps/details?id=soulrefresh.beautiful.prayer

Catholic Rosary Guide  for Android:

Pray the Rosary every day, countless blessings will be showered upon your life if you recite the Rosary faithfully. 

https://play.google.com/store/apps/details?id=com.myrosaryapp

Divine Mercy Chaplet Guide (A Powerful prayer) BFF = Be Filled Faith:

https://play.google.com/store/apps/details?id=com.dmercyapp 

Comments

Popular posts from this blog

Notepad++ convert multiple lines to a single line and vice versa

Notepad++ is an awesome text editing tool, it can accept regex to process the text data. If the data is in a “.csv” format or comma separated values which is basically just a text file that can either be opened using a text editor, excel or even word. Notepad++ can process the contents of the file using regex. Example if the data has multiple rows or lines, and what is needed is to convert the whole lines of data into a single line. Notepad++ can easily do it using regex. However, if the data is on a single line and it needs to be converted into multiple lines or rows then regex can also be used for this case. Here’s an example on how to convert multiple rows or lines into a single line. Example data: Multiple rows, just a sample data. Press Ctrl+H, and  on "Find what" type: [\r\n]+ and on "Replace with" type with: , (white space) --white space is needed if need to have a space in between the data. See image below, "Regular Expression" must be se

WMIC get computer name

WMIC get computer model, manufacturer, computer name and  username. WMIC is a command-line tool and that can generate information about computer model, its manufacturer, its username and other informations depending on the parameters provided. Why would you need a command line tool if there’s a GUI to check? If you have 20 or 100 computers, or even more. It’s quite a big task just checking the GUI to check the computer model and username. If you have remote computers, you need to delegate someone in the remote office or location to check. Or you can just write a batch file or script to automate the task. Here’s the code below on how get computer model, manufacturer and the username. Open an elevated command prompt and type:     wmic computersystem get "Model","Manufacturer", "Name", "UserName" Just copy and paste the code above, the word “computersystem” does not need to be change to a computer name. A

How to check office version from command line

The are quite a few ways to check office version it can be done via registry, PowerShell or VBScript and of course, good old command line can also do it. Checking Windows office version whether it is Office 2010, Office, 2013, Office 2016 or other version is quite important to check compatibility of documents; or just a part of software inventory. For PowerShell this simple snippet can check the office version: $ol = New-Object -ComObject Excel.Application $ol . Version The command line option will tell you where’s the path located; the result will also tell whether office is 32-bit, 64-bit and of course the version of the office as well. Here’s the command that will check the office version and which program directory the file is located which will tell whether it’s 32-bit or 64-bit. Command to search for Excel.exe: DIR C:\ /s excel.exe | find   /i "Directory of"  Above command assumes that program files is on  C: drive. Sample Outpu